Cadillac Escalade ABS Removal Instructions
Look your abs system over carefully , you may not have to remove the Hydraulic pump or any of its brake lines, All we need is the Upper Electronic Module which usually can be removed without removing the pump. Make sure to Remove the 60 amp abs fuse under the hood. Before starting any work on the abs system.
Electronic Brake Control Module (EBCM) Replacement (w/ JL4)
Removal Procedure:
Important: After installation, calibrate the new EBCM to the tire size that is appropriate to the vehicle.
Caution: Refer to Battery Disconnect Caution in Service Precautions.

1. Disconnect the negative battery cable.
2. Raise and suitably support the vehicle. Refer to Vehicle Lifting.
Important: The area around the EHCU MUST be free from loose dirt to prevent contamination of disassembled ABS components.
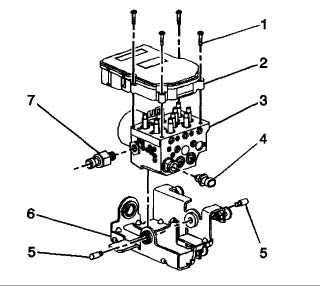
3. Thoroughly wash all contaminants from around the EHCU (1).
4. Disconnect the brake fluid pressure sensor (7) and pressure accumulator switch (4) electrical connectors

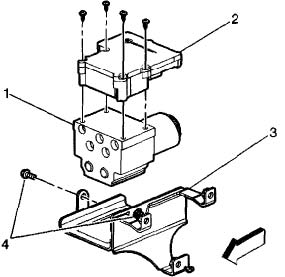
5. Remove the four mounting screws that fasten the EBCM (2) to the BPMV (1).
6. Remove the EBCM (2) from the BPMV (1). Removal may require a light amount of force. Important: Note the routing of the jumper harnesses for reinstallation.
7. Remove the EBCM and jumper harnesses from the vehicle.
8. Remove the jumper harnesses from the EBCM
9. Clean the BPMV to EBCM mounting surfaces with a clean cloth.
Installation Procedure:
1. Install the jumper harnesses to the EBCM.
2. Install the EBCM and jumper harnesses to the vehicle. Important:
- Do not reuse the old mounting screws. Always install new mounting screws with the new EBCM.
- Do not use RTV or any other type of sealant on the EBCM gasket or mating surfaces
3. Install the EBCM (2) on to the BPMV (1). Notice: Refer to Fastener Notice in Service Precautions.
4. Install the four new screws in the EBCM (2). Tighten the four screws to 5 Nm (39 inch lbs.) in an X-pattern.
5. Connect the brake fluid pressure sensor (7) and pressure accumulator switch (4) electrical connectors.
6. Lower the vehicle.
7. Connect the negative battery cable.
Download a pdf of these instructions here
